Documents
FlexPro lets you create and manage multipage documents directly in the project database. In this type of document you can then embed diagrams, text, tables and media or create links to objects within the project database.
The powerful FlexPro Document Editor also lets you create your own drawings, such as the sketch of a test setup, thereby creating expressive and appealing documents. You can also embed any OLE objects and images, such as your company logo, into the documents.
Sections
You can split a single document into several sections to use different headers and footers or page layouts and orientation within that document. For example, you can start a new document section to display a diagram on a page.
Page Layout
The page layout of a document specifies the size of the document pages and the size of the margins. The page size does not necessarily have to be the same size as that used for printing. FlexPro can adjust the document to the paper size later. However, if you want a printout that is true to scale, you should also use your printer’s page size for documents.
The page margins are only there to provide onscreen visual orientation. FlexPro lets you draw outside the margins that have been set.
Headers and Footers
You can create headers and footers semi-automatically by selecting the option Document Tools/Design[Header] > Header and Footer and then place shapes or images on the top or bottom of the document page. Alternatively, for individual shapes you can use the Add to Header command. These shapes are then displayed at the same location on every page of the document section. When printing on both sides of a page, the headers and footers of the left and right sides usually differ. For this purpose, select the option Different odd and even pages. The first page often differs from the subsequent pages. Selecting the option Different First Page gives the first page its own header.
Multipage Presentation Objects
The use of the document editor integrated in FlexPro also offers you additional options, which are not available in your word processing program. For example, 2D diagrams and column tables can wrap automatically on subsequent pages. The number of pages adjusts automatically to the amount of data. Diagrams in this case are the same size on all pages, but you can position them on each page individually. In the case of tables, it is possible to adjust not only the position, but also the height of each individual page.
Document Collection
You can add several subdocuments as links in the main document, such as the analysis results from measurements in a series of tests. To do this, in the main document you can add a document collection that you can use to search for documents via a search path or data query, which should be fully or partially embedded into the main document.
Also refer to the project database example Document Collection and Series Analysis.fpd in the folder C:\Users\Public\Documents\Weisang\FlexPro\2021\Examples or C:>Users>Public>Public Documents>Weisang>FlexPro>2021>Examples.
Table of Contents and Table of Figures
You can add a table of contents as well as a table of figures for diagrams, tables, pictures and formulas to a document. These indexes are created automatically when FlexPro searches the document for captions, headings or text boxes for which you have defined an outline level or caption category. If you have embedded subdocuments into a document using a data collection, their headings will also be added to the index. If necessary, you can downgrade the outline level for embedded documents in order to integrate them into the outline of the main document.
Virtual and Real Document Pages
When you add a document collection, a multipage diagram, a multipage table or a table of contents to a document, you can define whether the additional pages of the object should be displayed on the existing real pages of the document or if virtual blank pages should be added. Virtual pages differ from real pages in that you cannot place any other shapes on them. Instead, for shapes on the real document page where the multipage object was placed, you can specify that they should also be displayed on the virtual subsequent pages. As a rule, real pages need to be added explicitly. When updating a document, FlexPro only adds blank real pages to the end of the document if they will be needed in order to display a multipage object in its entirety.
Shape Alignment Options
If you have created a group of shapes, you can align the entire group to the left, right, top or bottom of the page or centered on the page. You can align shapes relative to each other or to the margins of pages. You do not have to select or move the objects individually. When you move or resize objects, alignment guides appear which you can use very easily to align other objects.
You can also align objects using the grid. When you draw or drag objects, the corners are aligned to the nearest grid intersection point. Even if the grid is not visible, it still helps you to align the objects automatically. You can change the grid spacing and permanently or temporarily deactivate automatic alignment to the grid.
Grouping Shapes
If you combine several shapes into a group, you can edit the objects as if they were one object. You can assign a property to all individual objects of a group simultaneously, such as hatching or a line color. The objects can also be resized, moved, tilted and rotated as a group.
Grouping the shapes is also very useful when creating complex graphics. You can create groups within groups and thus create a group hierarchy. You can draw a set of objects and group the objects, then draw the next set and group it, etc. Therefore, if you need to edit a section of the drawing, you can undo the grouping for this section without affecting the other groupings.
Using Cursors in the Document
You can also measure diagrams using cursors in the document. While the cursors in the worksheet are always active, in the document, you have to activate them first. You then have access to all Cursor options.
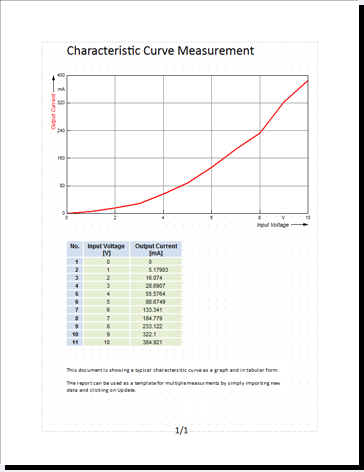
The following illustration shows a typical document:
See Also
Multipage Diagrams and Column Tables
Working with Documents
Setting Up the Page Layout, Orientation, Page Color and Margins
Adding a Table of Contents or Table of Figures
Displaying Multiple Adjacent Pages
Activating or Deactivating the Automatic Snap to Grid Feature
Linking and Embedding Presentation Objects
Linking to a Document Collection
Editing Presentation Object Links
Converting a Presentation Object into a Drawing
Linking and Embedding OLE Objects
Editing an Embedded or Linked OLE Object
Labeling Diagrams, Tables and Pictures